Thursday, August 30, 2018

Fjord Norway - July 2018

If you do not want to read through the entire post, you can read a summary in the Tips section


Itinerary

Day 0: Land at Alesund Vigra airport at 4:30 pm. Drove to hostel at Bjorke

Day 1: Geirangerfjord cruise and Trollstigen (Other options: Fjord cruise between Flam and Gudvangen)

Day 2: Dalsnibba and Gamle strynefjellsvegen (Other options: Route 55 - Sognefjellet)

Day 3: Loen skylift and Briskdal glacier (Other options: Kjenndal glacier)

Day 4: Runde bird island and Scenic Route 655

Day 5: Viddal village and drive back to airport


Preface

There are two aspects of Norway that will make your head hit the ceiling, your jaw drop to the floor, your teeth cut your tongue in two, and your eyes pop out of their sockets:
  1. The landscape (in a good way)
  2. The prices (not so good way)
Norway is synonymous with dramatic landscapes. Even so, Norway is a huge country and offers various types of nature tourism destinations. It can be broadly split into the Arctic region in the North, the Fjord regions in the West and the more populated South.


Planning

Our original idea was to start our trip with the midnight sun at Tromso North of the Arctic Circle, then proceed southwards to the Fjords before ending the trip at Oslo. However this turned out to be prohibitively expensive. Instead we settled for a 5 day trip of the Fjord region alone.

Stay

We stayed the entire 5 days at a single hostel deep in the middle of nowhere, almost at the end of a country road. However, you could consider doing it differently such that you stay each night at a different location. That way you can cover more.

While hotels are about twice as expensive as elsewhere in Western Europe, campsites are pretty cheap. If you can, you should consider renting a motor home and then staying in camps.


Flying in and around

Norway has dozens of airports and a handful of them cater to international flights, at least from elsewhere in Europe. Unless you plan to arrive in the South (where you might get train connections), it is best to fly in. Make sure to book well in advance, otherwise prepare to shell out a lot for the flight tickets.

Even traveling within the country is easier by flight. Remember Norway is a huge country. For example, Oslo to Tromso is over 1800 kms by road, and there is no railway up north. If you want to cover more than one region, it would be wise to consider Wilderoe's Explore Norway summer ticket, which gives you up to 2 weeks of unlimited flights in the country.

We flew into and out of Alesund Vigra airport. Other gateways for the Fjord region are Bergen airport and Trondheim airport.


Getting around

The best way to explore Norway is by car. Rental prices are a little higher than elsewhere in Western Europe, so is fuel. It is still cheaper to drive if you are 2 or more people. This is because public transport is not really set up to cater to tourists.


Tips


General

  • If you can, rent a motor home and stay in camps. It is the cheapest.
  • In any case, renting a car is the best way to explore Norway.
  • Use Wilderoe Explore Norway summer ticket if you plan to cover more than one small region.
  • Buy food at supermarkets. It is much cheaper than eating at restaurants or buying at a convenience store. During out entire trip we did not have a single meal at a restaurant.


Driving


The internet is full of articles about driving tips for Norway. I'll summarize some of it here
  • Headlights always on - 24 hours a day throughout the year, in dipped mode
  • Extremely strict about speed limits (including license cancellation and even jail term)
  • Rental cars have their speedometers calibrated to show 10% below the actual speed. So you might be driving slower than the speed limit. If you see someone following you for a few minutes, pull aside and let them pass.
  • No motorways outside the Oslo region. Most roads have a speed limit of 80km/h.
  • This makes driving in Norway a pleasure - people stick to the speed limits, everybody follows the rules. On the narrow roads drivers are very polite and cooperative, allowing oncoming vehicles to pass wherever possible.
  • Places look much closer on the map than they actually are. Always allow more time to get from point A to point B. I cannot stress this point enough.


Tunnels


No matter where you go, you cannot escape the tunnels. Almost 10% of our 1000 kms was tunnels. I did not particularly enjoy driving in the tunnels. And some tunnels were long (the longest we encountered was 7.8 kms)
  • For one, I would subconsciously reduce speed in the tunnels thereby holding back a line of cars behind me. 
  • Secondly, I would have my sunglasses on to prevent the glare when I exit the tunnel, but this did not help my vision inside the tunnels.
  • Third, it is often the case that you need to make your next turn immediately after the exit of a tunnel. However, in the longer  tunnels you lose GPS signal, so sometimes you hear the GPS instruction too late.
  • Finally many of the under-sea tunnels are very steep. The 7.8 km one was almost 5 km downhill one way followed by a steep 3 km uphill. Not very convenient if you have an automatic transmission car.


Ferries


Almost any route in the fjord region involves ferries.
  • The ferries are rather large and comfortable to maneuver your car onto.
  •  Queuing up for the ferries was confusing for us. There are several lanes at the ferry terminals, and it turns out you queue up column-wise (not row-wise). When one lane is full, then you queue up at the next lane. This means that being in the front row does not necessarily mean you will get onto the ferry first.
  • The ferry ticket normally includes the car and driver. You only need to pay extra for co passengers.
  • You can pay by card on most ferries.

If you are not interested in the all the in-depth details, you can stop reading here. If you want to see the maps, photos and other information on the places we visited, read on.


Day 0: Alesund Vigra airport to hostel at Bjorke


If you do not see the embedded map above, click here to see the route in Google Maps.


Most of the way is E39 to Bergen and is a scenic drive. The last leg is Fv41 which is a mostly single lane rural road heading out to nowhere. The hostel is along the Hjorundfjord and the scenery is impossible to describe. This was the view almost at 10 pm.

Hjorundfjord from Bjorke village

Day 1: Geirangerfjord and Trollstigen


If you do not see the embedded map above, click here to open in Google Maps.

Geirangerfjord is a UNESCO World Heritage site, and it is easy to see why. We took the fjord cruise from Hellesylt to Geiranger because Hellesylt is only an hour from Bjorke. The fjord cruise itself is an hour long and there are detailed audio announcements on the cruise.

A popular alternative to Geiranger fjord cruise is the Flam-Gudvangen cruise which is over 2 hours long (it is on the longest fjord in Norway). Unlike Geirangerfjord, this cruise does not accept cars though. So you'll have to park at Flam, then take the cruise, return to Flam by bus to collect your car.

Even during the summer, the Geirangerfjord cruise only runs every 90 minutes. We arrived at the Hellesylt ferry terminal with 15 minutes to spare for the 11 am departure but there was already a large queue. There was also some confusion about what lane to wait in (see "Ferries" section in the "Driving tips" above). All this led us to miss the 11:00 cruise and had to wait at Hellesylt until 12:30. Thankfully the ferry terminal has beautiful views onto the fjord so 90 minutes just fly by.

The cruise ends at the village of Geiranger. From here we proceeded to Eagle road which provides an amazing viewpoint over the fjord.

Next we continued on National Touristic Route 63 to Trollstigen which is one of the most famous landmarks of this region. Since the weather was great and it was a weekend we encountered lot of vehicles here (this is what counts as "traffic" in Norway).

Trollstigen
While returning to the hostel we took the Liabygda-Stranda ferry and then Fv60.

If you have time, I suggest to stop at Gubrandsjuvet which is about a half hour from Trollstigen.

Day 2: Dalsnibba and Gamle strynefjellsvegen


If you do not see the embedded map above, click here to see it in Google Maps.

Dalsnibba is apparently Europe's highest Fjord viewing platform (whatever that means). It is almost 1500m above sea level. Even when it is warm and sunny down in the valley, it can get cold and windy at the viewpoint. I strongly recommend being prepared for the chill if you plan to visit here.

The views of Geirangerfjord from up here are to kill for. Here is just one example. And oh, see the zig-zag road on the right in this pic? The top most point of that zig-zag road is Eagle point - which we had visited the previous day.

View from Dalsnibba viewpoint

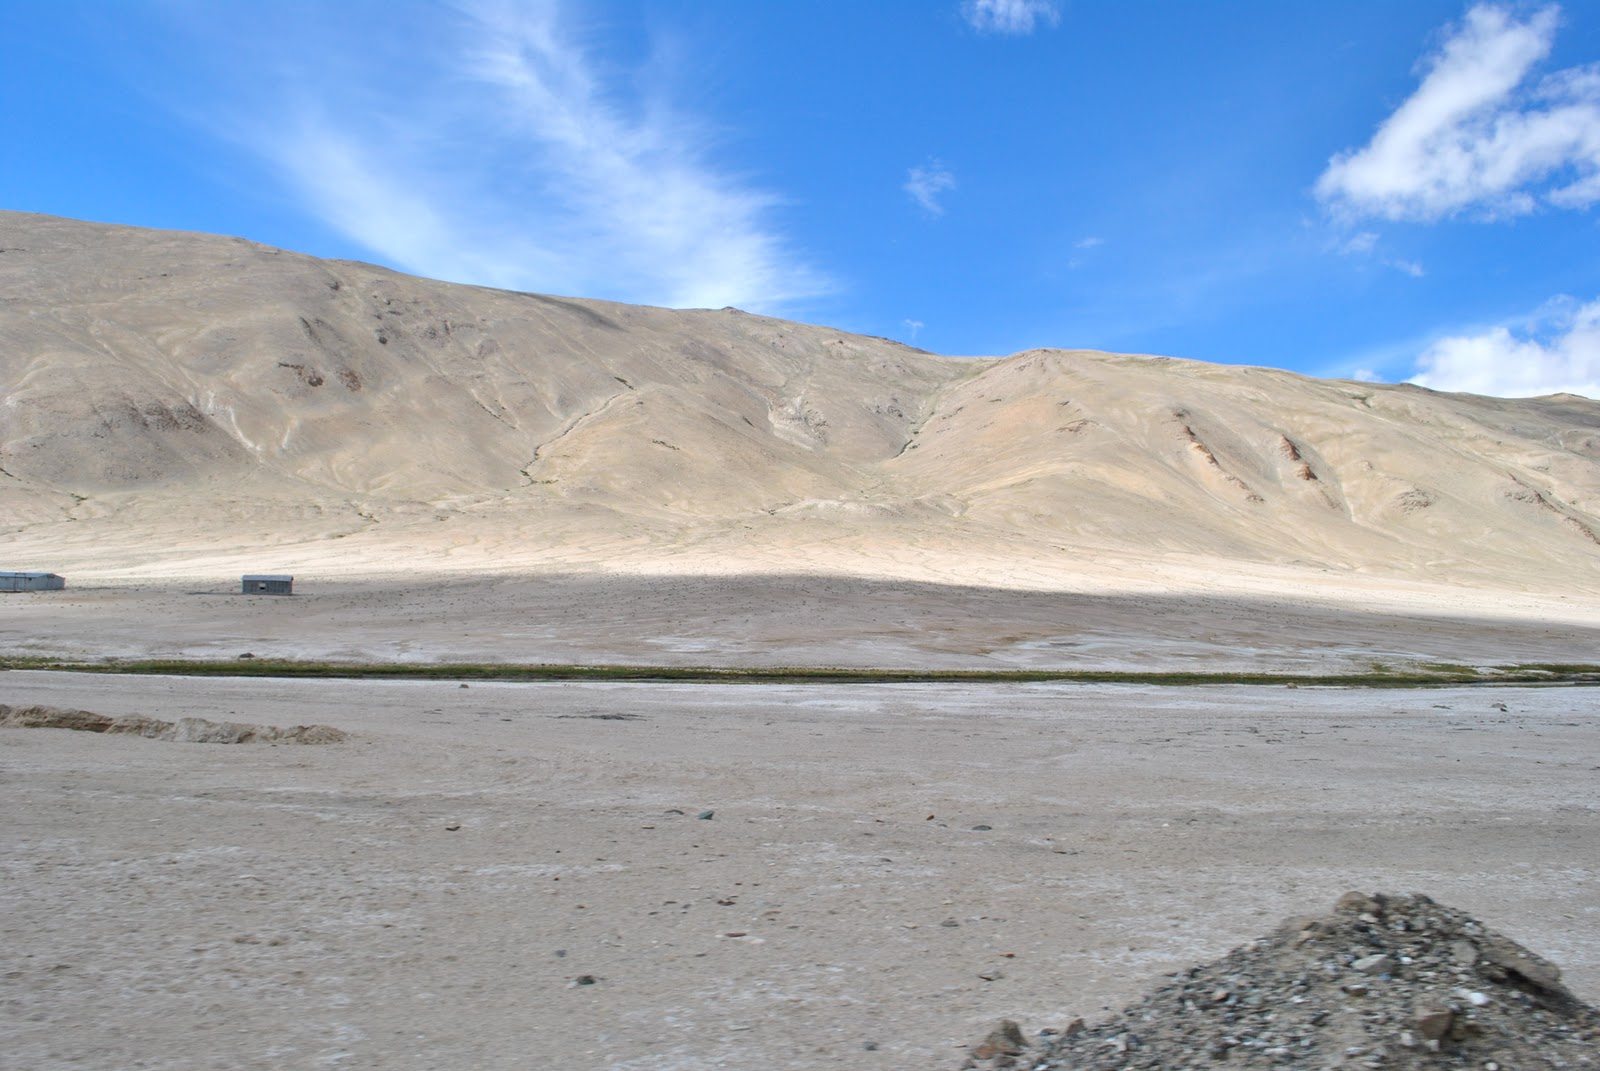
From Dalsnibba, we proceeded to Scenic Route 258 (Gamle strynefjellsvegen). This is a 28 km stretch of now-abandoned road (since Fv15 was constructed with several tunnels). Some stretches are barely paved and it is pretty narrow. The stark scenery reminded me very much of Ladakh in India though.

From Gamle, we proceeded back to our hostel. However, we regretted not also covering Route 55 (we were less than 2 hours from Prestesteinsvatnet on Sognefjellet). If you have time, I highly recommend doing at least part of Sognefjellet. In fact, I'd even go as far as recommending Route 55 instead of 258.

Day 3: Loen skylift and Briskdal glacier


If you cannot see the embedded map, click here to see it in Google Maps.

Loen skylift was the second on the list of most expensive activities on this vacation (after the fjord cruise). It is one of the steepest skylifts. The close up views of the rocky cliff as it nears the top are amazing. Also from the top you have a completely different perspective of the entire Nordfjord region.

The weather at the top was not very good though. Very cloudy and very windy. Not a great combination for photography

Briskdal Glacier is just over a half hour drive from Loen. It is also a very narrow road full of blind curves though. From the parking spot, there are the open "troll cars" that take you up to a spot that is a 10 minute walk from the tip of the Glacier.

You can also walk all the way - it takes about an hour. On the way up you need to cross a small bridge that is almost in the midst of a waterfall. You are sure to be soaked completely wet - make sure you are well prepared for this.

Briksdal is the only place where we paid for parking during the entire trip.

Briksdal glacier


Briksdal is one of the more accessible glacier arms. But it is also very touristy. An alternative is Kjenndalsbreen which is about the same distance from Loen.


Day 4: Runde bird island and Scenic route 655


If you do not see the embedded map above, click here to open it in Google Maps.

Runde is a bird lover's paradise. The drive itself is very different from the fjord scenery that we had had for the past few days. There are several beautiful (and narrow) bridges. There was also the longest and steepest tunnel of the entire trip (7.8 kms undersea).

From the parking spot, you need to undertake a very steep trek to reach the bird nesting spots. Unfortunately for us, it started raining when we were mid-way through the trek, so we had to turn back without catching sight of a single puffin.

The rain however made the next leg of the day all the more gorgeous: Route 655. Right from the time we boarded the Saebo-Leknes ferry, the rain only added to the ambiance. The route takes you through Oye, which was apparently once a popular tourist destination until a fire in the 80's.

The route also takes you through North Europe's narrowest ravine: Norangsdalen. Then, there's views like this. I don't know how it is legal to drive past this without stopping to take a million photos.

Lake along  Fv655

Day 5: Viddal village, Back to Alesund airport


If you do not see the map above, click here to view it in Google Maps.

A short single-lane tunnel drive away from Bjorke is the village of Viddal. It is the absolute dead-end of route Fv41. The place is the very definition of serenity. No tourists, barely any vehicles, barely any people, the Hjorundfjord in all its glory.

View from Viddal


We did not want to re-trace E39 on the return drive to the airport, so we chose to drive Fv60 instead. Just after Hellesylt is a 3 km tunnel and after that is a viewpoint over the fjord. This gave us an opportunity to give a proper farewell of sorts to Fjord Norway. There's also a Gondola at Stranda which we would have given a go if we had more time.


Conclusion


Every drive in Norway is a "scenic drive". I have no idea how they choose a handful as scenic routes. Every bend, every curve, every village, every lake, every ferry, every mountain is as jaw droppingly gorgeous as any other.

The English language is inadequate to describe Norway's beauty. Fjord Norway in particular has moved up to second spot on my list of most beautiful nature destinations - next only to Ladakh.

Sunday, April 23, 2017

Vienna and around - April 2017

It has been several years since I updated my travel blog. I have decided to try out a new format where I cut down on pages and pages of descriptions, and instead focus on facts and tips that might be of use to others.

Itinerary

Day 0: Land at Vienna airport at 20:30
Day 1: Bratislava, Devin castle
Day 2: Hofburg Palace and around, Prater and around
Day 3: Schonbrunn palace
Day 4: MusuemsQuartier, WU. Depart from Vienna Airport at 21:00


Preface

  • There is way too much to do in and around Vienna. Research ahead, plan well and pick and choose. It is practically impossible to take in all the sights and attractions in a week or even a month probably.
  • Excellent public transport in the city. Also very reasonably priced (€2.20 for a single ride anywhere in the city, using any form of public transport). Also reasonably priced passes for 24, 42 or 72 hours are available.
  • Google Maps does not cover all the public transport options. Do not rely on it. Instead use Wiener Linien or this third party app. But these do not show the fast airport trains (which are run by OBB or CAT). For those, and other outstation trains, use the OBB app.
  • Transport is about the only reasonably priced thing in Vienna. Stay, food, entry tickets are all expensive compared to elsewhere in Europe.


Day 0: Arrival

Vienna airport is outside the city, and needless to say, pretty well connected. Trains and buses depart regularly from the airport and take you to various points in the city in around 15 minutes.A train ticket from the airport costs €3.90 and is valid until your final destination.

We landed around 8:30 at night, and as expected did not do much on Day 0. Checked in to the hotel and went to sleep.

Day 1: Bratislava

Bratislava, the capital of Slovakia, is about an hour by train from Vienna. Trains run from Vienna main station (Wien Hauptbahnhof) to both Bratislava Main station and Bratislava Petržalka.

We wanted to visit Devin castle outside Bratislava first. We took the train to Petržalka, and from there bus 91 to Most SNP which is sort of a bus terminus in Bratislava. From there, we took Bus 29 which takes you to Devin castle in about 20 minutes.


In hindsight, we think it would have been more convenient to take the train to Bratislava central station. 

A day pass for Bratislava including zones 100 and 101 costs just €3.50. Devin castle is in Zone 101 so this ticket is valid for Devin castle too.

Devin castle is really beautiful. It was absolutely worth the visit. Overlooking both Danube and Morava rivers, it is a sight to behold. The entry fee to the castle is €4 per head.

View from Devin Castle


Bratislava old town is also very nice. Good enough to spend an entire afternoon. Food is relatively cheap compared to Vienna.

For the return to Vienna, we walked to the main station, where we missed the train to Vienna by about 10 minutes. The next one however was almost 2 hours away. So, we took bus 93 from main station to Petržalka,  where there are hourly trains to Vienna.


Tips:

  • On the onward journey, go to Bratislava main station, and use Petržalka for the return journey
  • Most places in Bratislava are generally child-buggy friendly, but there are exceptions. Bus 29, for example, has steps that you need to climb. 
  • Devin castle has some flights of stairs here and there but mostly you can manage with a child buggy. The initial climb is very steep but it is a road so you can push the buggy up the hill.
  • Main station does not have lifts but there are provisions to cross the tracks at the ends of the platforms. 

Day 2: Hofbug Palace and around, Prater

Hofburg palace and the area around is packed to the brim with tourist attractions. Museums. Shopping streets. St. Stephen's Catherdral. Austrian National Library.

Take your pick. Extremely well connected by U-Bahn. Do account for the crowds though!

Late in the afternoon, we visited Prater. The main attraction here is a theme park, but we were more interested in the micronation: Republic of KugelMugel. Look it up, it has a very interesting history.

Tip: While you are here, visit the WU library. It is a modern architecture attraction. We somehow missed it and ended up visiting it on Day 4 when it was closed so we could only photograph it from outside.
WU Library

Day 3: Schonbrunn Palace

There was an hour long queue for tickets to get into Schonbrunn palace, so we skipped the queue. The gardens are so vast that we spent an entire day there! There's a children's museum, a maze, a zoo and a small hill with a view in the gardens. If you had only one day in Vienna, then I would suggest Schonbrunn palace as the place to visit.

Schonbrunn palace

Day 4: MusuemsQuartier, WU

MuseumsQuartier has, you guessed it, museums. Lots of them. We took a tour of Mumok, which is a modern art museum. We did not understand a single item in the entire museum of 6 floors.

My suggestion: Research in advance and decide what museum you want to visit.

On the afternoon of our last day in Vienna, we decided to take in the sights by using surface transport. We had been using mostly the subway until now, which is not the best way to see a city. So we hopped on a random tram and went to its last station. This took us to Prater again and fortunately we got to visit WU.

We then took this tram back and stumbled upon another well-known attraction: Hundertwasserhaus. This one also has an interesting story behind it. Look it up!

Hundertwasserhaus


Outbound

Remember that Vienna international airport is a large airport with lots of terminals and gates. It is wise to allocate extra time to navigate the airport on your way out!

Conclusion

  • Vienna has something for everyone. Arts, music, technology, architecture, history, outdoors, children.
  • Vienna is relatively expensive compared to many other European cities.
  • Compared to many other places we have visited, we felt the need to research in advance is more noticeable for Vienna. 

Monday, September 10, 2012

Bhutan August 2012: Part 1 – Introduction and Preparation


This post is the first in the travelog series for our recent trip to Bhutan. The Land of the Thunder Dragon. The Last Shangri-La. The Country Without Traffic Lights. The Land of Happiness (or, more accurately, The Country where they Measure Gross National Happiness).

Since lot of people have asked me about details like stay and booking, I'll start off with an introductory post that also tells you how to prepare for your trip to Bhutan. Also, taking into account feedback I got for my previous travelogs, I am including info about tour operators, prices, and the like.

Our itinerary

Well, I won't actually go about giving an overview of the country itself – wikitravel, wikipedia and the various tourist websites do far better a job of it than I could ever do! What I will do, is give an overview of our itinerary. Ours was a 7 days and 7 nights trip.

Day 1 (12 Aug):
  • Arrival in Bhutan at Paro airport (noon)
  • Drive to Chelela pass after lunch
  • Hike to Kili Nunnery on the way back
  • Cultural events and stay overnight at farmhouse

Day 2 (13 Aug):
  • Hike to legendary Taktsang monastery (Tiger's Nest)
  • Local Paro sight seeing (Dzong, Paro town)

Day 3 (14 Aug):
  • Drive to Thimpu
  • Sight-seeing at Thimpu (Stupa, Zoo, view-point of Parliament and King's Palace, nunnery, arts-and-crafts school, handicrafts emporium, shopping)

Day 4 (15 Aug):
  • Drive from Thimpu to Trongsa (8 hours) – via DochuLa pass

Day 5 (16 Aug):
  • Trongsa sight-seeing (Dzong, musuem)
  • Drive to Chamkar (Bumthang)
  • Sight-seeing in and around Chamkar (Dzong, Kurjay Lhakhang)

Day 6 (17 Aug):
  • Drive from Chamkar to Punakha (8 hours)

Day 7 (18th Aug):
  • Punakha Dzong
  • Trek to Chimi Lhakhang monastery
  • Drive to Thimpu
  • Shopping at Thimpu
  • Drive back to Paro

Day 8 (19th Aug):
  • Early morning departure from Bhutan (Paro airport)

Preparation

This section is for those of you who are planning to visit Bhutan in the future. Hopefully these tips will help you prepare better.

Indians enjoy the privilege of being allowed to Bhutan on their own. Tourists from other countries MUST go through a tour operator though, and must be accompanied by guides. It is best to book your trip through one of the tour operators recognized by the Tourism Council of Bhutan.

We had booked through Bhutan Mountain Holiday. This was recommended to us by friends who had a good experience with this company – and we came away impressed! More on that later.

We planned our trip through e-mail and a few phone calls. The Bhutanese are extremely polite, helpful and patient. While planning our trip, we must have exchanged 50+ mails; and changed our itinerary a few times – all without any problem whatsoever.

We asked for a cultural and nature trip. This meant we visited at least one monastery and Dzong (more about Dzongs in the upcoming posts) in every place we stayed! In hindsight, we should have asked for just a nature package since we would have experienced Bhutanese culture regardless! You should consider asking for a “nature” package, with Taktsang and Punakha Dzong as cultural additions.

Finally, keep in mind that road journeys in Bhutan are tiring. The entire country is mountainous, and barring a few 2-lane wide roads in the Paro-Thimpu region, roads elsewhere are narrow. Driving speed averages around 25 km per hour. We made the mistake of planning for 200 km drives – twice! Had we known in advance that it would take 8 hours, we might have planned slightly differently (probably Phobjikha valley instead of Bumthang).

Prices

Tour operators will tailor the package as per your requirements and hence the quotes you get will vary a lot. We had received quotes ranging from Rs.3500/- per head per day all the way to Rs.7500/- per head per day (the latter being for 2-star and 3-star accommodations). These prices are all-inclusive
  • food
  • stay
  • all local transport (exclusive vehicle just for you!)
  • guide and driver
  • all entry fees and such
You wouldn't need to spend a single rupee extra! In fact, the only additional money we spent was on souvenirs, tips and a local SIM card which we purchased for making calls back home. Bhutanese currency (Ngultrum) is pegged to the Indian Rupee and INR is accepted anywhere in Bhutan.

The price seems steep at first, but believe me it isn't. Bhutan has this concept of Low-volume, High-impact tourism. A lot of the money you pay goes towards improving the living standards of the local population (building roads, hospitals, schools etc). Also, for non-Indians, the Royal Government has stipulated a fee of USD250/- per head per day. When you take all this into account, the rates quoted for Indians is very very reasonable.

Also, if you are an Indian, remember to book your flight tickets through your operator as well. The Druk Air website only mentions the USD rates which apply to people from other countries – and it is very very expensive in comparison. We paid Rs.6250/- per ticket per direction for the Kolkatta-Paro flight.

Tips

A recap of what I mentioned in the paras above; plus some additional tips
  • Book through a recognized travel operator – one of those listed on the Tourism Council of Bhutan's website.
  • Book your flight ticket through your tour operator instead of through the Druk Air website.
  • Do NOT carry any 500-rupee notes (these will be confiscated). Cards are accepted at quite a lot of places – so there is really no need to carry too much cash.
  • Ask for a nature package since that will cover both nature and cultural aspects. If you are short on time – just visit Paro, Thimpu and Punakha. The must-visit spots are Tiger's Nest monastery and Punakha Dzong.
  • There are no public telephone booths in Bhutan! SIM cards cost less than 100 rupees though, and calls to India cost less than Rs.5/- per minute. So you can purchase a SIM card the day you arrive.
  • Do carry a few pieces of “conservative” clothing. In particular, entering some of the Dzongs requires you to have a collared T-shirt or top.

The next post in this series will be the actual start of the travelog.

Saturday, August 21, 2010

Ladakh July 2010: Part 4 - Concluding Part (Manali, Delhi, Bangalore)

In part 1 of this series, you accompanied us on a local tour of Leh. In part 2, you tried to imagine how the Pangong experience might be, and ascended up the highest motorable pass in the world into Nubra. In part 3, you read about our exploits of TsoMoriri and TsoKar, and of our bidding farewell to Ladakh and halting at Keylong.

In this concluding part of the series, I recount our journey from Kelyong to Manali, and then to Delhi before flying back to Bangalore. Technically, this installment is not part of Ladakh since we had exited it and entered HP the previous day. But, try dissuading me from writing this part!

Day 10: Mon, 26th Jul – Keyong to Manali
Anticipating heavy tourist traffic at Rohtang pass, and eager to avoid it, we left pretty early from Keylong – 7 a.m to be exact. Our idea was to reach Manali by lunch time. But that was not to be.

We had already taken leave of Trashi the previous evening, and he had arranged a Tata Sumo for us to take us to Manali. We headed South out of Keylong and were greeted with the lush greens of Himachal Pradesh. Road widening was going on at several places. We stopped for fuel at Tandi, which, as I mentioned earlier, is the first petrol pump after Leh!

At 9, we stopped for tea at Khoksar. After that, it was an hour long climb to Rohtang. Just a few kms shy of Rohtang pass, at Gramphoo, we saw the deviation towards Lahaul and Spiti valley (a place which I hope to visit in the near future). Passing right through the clouds was a mesmerizing experience. We stopped for snaps at the pass, but since there was no snow here, we didn't see any of the usual attractions – yaks, snow-scooters etc.

We left at 10:30. The condition of the road down from Rohtang to Manali is pathetic. And tourists had already started arriving in hordes from Manali – that did not help in any way. We got stuck in a traffic jam and we were at a standstill for almost 3 hours. Even after that, we inched our way through North-bound traffic.


It was late afternoon, almost 4 pm when we reached Manali. Here we checked into a very reasonably priced hotel and set out to explore. It was raining so weren't in the mood for too much sight seeing. We spent about half an hour at Ban Vihar (where Sandy and Santhu had their snaps clicked with really fluffy rabbits), and then did some shopping (for shawls and sweaters).

After that, we just roamed around in Mall Road. We purchased wooden key-chains with our names calligraphed on them by a street artist. It was impressive, I tell you. We also met a Bangalorean who was on his way to Nubra to shoot a film for NGC. After dinner, we watched TV before turning in pretty late.

Day 11: Tue, 27th Jul – Manali – Delhi
We woke up leisurely (must have been only the second such instance during the entire trip), and were ready only by 10. We checked out, kept our luggage at the hotel and set out for the day.

After breakfast, we walked up to Hidimba temple, in the light rain. On the way down from there, Santhu fulfilled his wish of photographing apples from touching distance. It was noon by the time we were back down at Mall road.

We then crossed the bridge to the left bank of the Beas and spent over an hour there, taking in the cloud-shrouded, conifer-filled mountain slopes. By the way, the “left bank” is with reference to the direction the river flows. Beas seemed to be furious with someone. This river wasn't flowing – it was blasting its way through! It inspired Santhu to write a few more short poems, and cough cough .. yours truly coughed up a few lines of poetry too .. in Kannada!

We finally returned to Mall road by 2, and by the time we had lunch it was 3. We then visited the Buddhist temple which is bang opposite Ban Vihar. We spent more than half an hour here since we liked the calm and quiet of the place. We then proceeded to collect luggage from our hotel and took an auto to Manali's “private bus stand”, which is the filthiest bus stand I've ever seen. Our 5 pm Volvo to Delhi departed on time but the rain and fog meant it was slow progress.

We stopped around 10 pm near Mandi for dinner. The dhaba was not exactly clean – but it was cheap all right. 120 bucks for dinner for 3 people – and that bill includes one lassi.

Day 12: Wed, 28th Jul- Delhi-Bangalore.
There was a road block for about half an hour (must have been around 4 a.m). By 5:30, we were still at Chandigarh. We stopped for breakfast around 7 am somewhere after Ambala on NH1. I have written before about this absolutely fabulous road, and we were soon hurtling down the straights at 3-digit speeds. It was sad to see pedestrians trying to cross six lanes taking on zooming vehicles at places like Panipat and Karnal.

We entered Delhi around 10 and it was well past 10:30 when we finally alighted at Janpath. We hired a taxi for Delhi sight seeing.

First stop was India Gate. From there, we went to Mahatma Gandhi's house and then drove past Parliament and Rashtrapati Bhavan. A lunch break later, we went shopping in Karol Bagh. Needless to say, we returned with several bags, mostly of clothes that we had purchased for our folks. After all that shopping, we weren't in a mood for further sight seeing. We dropped the idea of visiting Qutb Minar and instead drove straight to the airport where we reached before 4 pm, for a 6:45 flight.

Killing time at Delhi airport is not at all a problem. To add to it, our in-flight dinner experience on the onward journey was not exactly good. So we decided to have a very early dinner at KFC at the airport. Our Jetlite flight took off a little late, and we landed in Bangalore only around 9:30.

I expected that we'd exit the airport more than half an hour after that, and that I'd have to wait for a bus back home. I was wrong. 20 minutes after touch down, we were outside the airport. What's more, a Volvo to my area was ready for departure! By 10:05, we were on the highway, and believe it or not, by 11 pm, I was home! It took me a day to even realize that the trip was over!

Conclusion:
There are vacation destinations, and then there's Ladakh. It is more than a place. It gets into your psyche in a way you wouldn't believe possible. I am unconditionally in love with Ladakh and I have already made up my mind to return there 2 years from now. Next time I am there, I want to do a small trek (maybe 2-3 days); and I want to visit some of the restricted areas (Hanle in particular).

No words, no pictures, no videos have ever done justice to the place, and none will ever do. You have to experience it to believe it.

Travel Tips:
It was raining throughout in HP, Manali almost till we reached Delhi. And we didn't have an umbrella. It might be prudent to carry one if you are planning to pass through Manali. Throughout the 4 month tourist season in Ladakh, its monsoon in HP.
Regardless of the direction you are travelling, always aim to reach Rohtang pretty early (by 10 am). You never know what kind of traffic jam you might get into up there, and you don't wanna be stuck there in fading light.

Monday, August 16, 2010

Ladakh July 2010: Part 3 (TsoMoriri, TsoKar, Keylong)

In Part 1, you read about our visit in and around Leh. Part 2 of this travelog series took you through Pangong and Nubra. In this installment, you'll accompany us out of Leh, through TsoMoriri and Tsokar, and into Keylong. And do check out the travel tips section at the end of the post.

Day 7: Friday, 23rd July – TsoMoriri
It was time to say good-bye to Leh. We checked out of our guest house at 8 am, bidding farewell to our hosts. Our route today took us on the Leh-Manali highway past Shay, Thiksay and Karu until Upshi, where we had to show our permits.

After Upshi, we branch off to the left, following the Indus river. We would be following the Indus river upstream for a good 3 hours. The roads are much better here, and you also see villages every 10-15 kms or so. There was a spot where a wooden bridge crossed a stream. We stopped here to collect drinking water and also to do some photography. It was a very beautiful spot where we could see a distant peak playing hide and seek with the clouds.


Our next stop was at Chumathang where there are hot springs. It is amazing to see the boiling water bubble out angrily from the ground. We wanted to bathe here but the bathroom facilities were rudimentary, at best. We had a mid-morning snack of Maggi noodles and then continued on our way. By noon, we were at Mahe bridge. We showed our permits here again. If you go straight (in a South-Easterly direction), you enter the restricted areas of Nyoma and Hanle. We turned right, crossed the bridge and headed South to TsoMoriri.

The roads were still excellent. They had a purplish tinge to at the sides. Must be the soil colour. We then ascended a very small pass and soon, a small lake came into view. This lake is named Thadsang Karu. It was covered with clouds just above its surface when we reached there. It would have made for an amazing photoshoot. But there was a very light drizzle, which brought in strong winds and the accompanying chill. Within 3 minutes, we were huddled back in our car. So much for photo-shoots!


We continued along Thadsang Karu, now on mud roads. 15 minutes later, Tso Moriri made an appearance on the horizon. Even then we had to drive for 45 minutes before we could reach our camp. At almost 3 pm, we checked in to the camp. Unlike the camp at Pangong, which was almost on the lake shore, this one is set up mid-way up a small hill overlooking the lake. There is also a village next to the campsite. Because of this, the feeling of isolation was missing here. The views, however, were as breath-taking as those at Pangong.

We first took a stroll to the lake, and then along it. Again, the experience of looking out at the indescribable colour combinations of the lake, the breeze blowing lightly, the mountains wherever you look up. We were actually annoyed when it was time time to return to camp!


Dinner was pretty early. When we were done with dinner, it wasn't completely dark yet. Just when we came out of the dining tent, we were treated with the sight of a near-full moon (maybe just 2 days shy of full moon). And the moon was casting a fluorescent tinge on TsoMoriri. It was an extraordinary sight. I rushed to get the tripod and set it up. For the next 15 minutes, we took turns trying to get long-exposure shots from the Nikon D3000 and the Canon Powershot S3IS. We did get a few good-looking ones at exposures of 15 seconds plus.

By now it was really cold. We were given those rubber bags filled with hot water, with a sheepskin pouch added to it. We wondered why they were going to such great lengths. We got the answer when we hit the sack. This was to be the coldest night of the trip. It was so damn chilly, that when we turned to one side of the bed, the other side would get freezing cold! This, in spite of multiple layers of clothing and multiple blankets and rugs.

Day 8: Sat, 24th July – TsoKar
We caught the sunrise bang outside our tent at 5:30. This time there were no clouds playing spoilsport. We had breakfast around 7:30 and left by 8. We retraced the mud track for an hour back till Thadsang Karu, where we hit the tar road. There were no clouds over this lake today and as such it seemed brighter. Less than an hour later, about some 15 kms before Mahe, is the deviation to the left which takes you west-ward to TsoKar.

The next 2 hours were yet another experience etched in my memory. It was a dirt road through a valley. We first saw the Puga hot springs in the distance – but did not stop. After that, we drove through deserted wilderness – with almost no sign of civilization whatsoever. It was almost as of we were the only humans left on Earth. We only had wild asses for company every 5-10 kms. This drive would easily qualify for Discovery Travel&Living channel's series “Journeys to the Ends of the Earth”.


Only past 11 am did we hit a metalled road and reached TsoKar village. We caught glimpses of the TsoKar lake now. We saw some white deposits and were excited that it might be snow. It turned out that the white patches were salt deposits. We learnt there that we had to cross the entire width of the valley to reach our camp. The valley here is one big pasture. It took us more than 15 minutes to cross the pasture and reach our camp.

The camp here is the largest of all that we had seen so far. Since we were too early for lunch, we just had a quick tea and drove to the lake. This is yet another 15 minute drive. Unlike Pangong or TsoMoriri, the camp at TsoKar is not right by the lake. Instead it is in a pasture some 3-4 kms away. When we reached the lake, we could see why.

The salt deposits raise a stink which seems okay at the beginning but which turns unbearable after you spend some time there. Needless to say, our photo session here was very short. We got the only snap of all 4 of us (the fourth person being Trashi) and then returned to camp.

Lunch was ready when we returned, a heavy lunch at that. That necessitated a good rest before we set off to explore. This place was already very windy – that gave us an indication of things to come at night. We saw quite a lot of birds some distance from our camp. I tried to capture some snaps unsuccessfully. Santhu had a better idea. He used some dry fruits as a bait. He had to wait almost an hour before the birds took his bait – but hats off to his perseverance, he got some amazing snaps.

We then set out to do some walking. We got some snaps of horses grazing in the pasture but these snaps were overexposed. We walked towards the lake, hoping to reach it in an hour. By this time there were lot of foreigners who had arrived at our camp and they too had started trekking towards the lake in 3-4groups.

45 minutes later, we weren't even half-way to the lake, and decided to return. Some of the foreigners continued while others did a U-turn as well. On the way back, I again photographed the horses and did a better job of it this time. We met a Belgian family that was camping in their own tent nearby. I had a discussion with the father about our cameras and lenses and stuff. It was nearing 6:30 when we returned to camp.

As soon as the sun set, the wind picked up speed. The wind was strongest here and we had this nagging fear that the tent might fly away. After dinner we sat for some time outside our tent but the sound of the wind flapping against the tent was irritating. We decided to go for a post dinner walk. That was another great experience. Here we were, walking at night from the middle of nowhere, to the middle of nowhere. We were back in our tent a half hour later, and ready for a good night's sleep.

Day 9: Sun, 25th July: TsoKar-Keylong.
The original plan was to stay at Sarchu today and leave for Manali the next day. However, Sarchu-Manali is a long drive and we had heard that Rohtang pass was not in a good shape. So we wanted to get as close to Manali as possible on this day itself. So we decided to try and reach Keylong instead. For that we had to depart as early as possible.

We woke up at 5:30, and getting to the common bath area was an effort in itself. Uh, didn't I mention that the bath and toilet is not attached here in TsoKar? It is just some 20 yards from the tent but like I said, it was cold, the water was cold. Washing your face and brushing in this cold water – that is something you're not going to forget in a hurry.

Mercifully, tea and breakfast was piping hot. We were on our way by 7 am. Just beyond our camp, we came across more Marmots but couldn't get any snaps. We headed west from our camp in the dirt roads in the pasture. 10 minutes later, we hit the Leh-Manali highway. Here, we took a left to head South. Soon, we were driving through the Morey plains which is a stretch of some half an hour of flat roads. However, there was lot of bridge construction going one here which forced us to drive off the road and in the dirt again. We could see large herds of Pashmina sheep grazing in the plains but couldn't get close enough to get good photos.

At the end of the plains, we got an awesome view of a river down in the valley. The map doesn't name this river but shows that it originates in (or flows to) TsoMoriri. By 8:30 we were in Pang, where we stopped for tea before continuing. From Pang, we started uphill and around 10 we were at LachulungLa pass. After this was one more of the numerous landmarks on Leh-Manali road: the Gata loops. This is a series of 21 hairpin bends that brings you down from an elevation of ~4650m to ~4100m in a span of ~7kms. Of course, we got some snaps here. We weren't going to let such an opportunity pass, were we?

Just after 11, we reached Sarchu. Here we stopped for an early lunch, and resumed at 11:30. Sarchu is the border between J&K and HP. So we were officially saying good-bye to Ladakh and entering Himachal Pradesh here. We felt a pang of sadness at this point. We had to bid farewell to a land that we had all unconditionally fallen in love with, and spent 9 days in.

So, in HP, the first half hour was fairly flat. There was a road block for about 20 minutes at one point where there was a bulldozer engaged in some work related to road widening. Once the block was cleared, we started ascending up BaralachLa. This pass looked like, as Sandy put it, mother nature had donned a Zebra-patterned veil. It was all black mountain face or white snow. Just after BaralachaLa is SurajTaal – which is a small, very pretty, high altitude lake.

The road condition improves a lot after here. Quite a few stretches are almost 2 lane wide with smooth riding surface. Road widening is going on in several other stretches. We passed by yet another picturesque small lake named DeepakTal where there was boating. We did not go boating though. Just clicked a couple of snaps and we were on our way.

Around quarter to 3, we reached Darcha, where we stopped for snacks. There on, it was an hour's drive to Keylong. The landscape changes drastically here. The terrain is similar to Ladakh but it is all green everywhere. There are more villages, more people. We checked into Hotel ChanderBhaga in Keylong around 4 pm. The first thing we did was have leisurely baths. Remember we had no access to hot water since the time we had left Leh more than 2 and half days back. You don't want to know how unwashed we looked and felt.

After bath, we went for a walking tour of the .. well.. town. Keylong is more than a village – it has a proper bus stand, several restaurants and hotels, a BSNL tower and telephone exchange. For the first time since we had left Leh, we were within range of Airtel network. So, yes, we toured the town, and on our way back, clicked snaps at a spot where dozens of vehicles were being washed in a stream which crosses the road.

It was dark when we returned to the hotel. After dinner, we spent a lot of time in front of the TV. We had forgotten what it is like to watch TV! We also had to say an emotional good-bye to Trashi now. Since the road between Keylong and Manali is very bad, and there were a couple of problem points, Trashi did not want to risk any damage to his brand new Innova. He arranged for a Tata Sumo to take us to Manali the next day. He would start at 5 am next day and aim to reach Leh the same evening.

The next part of this series will be the concluding part. So do come back.

Travel Tips
  • We think it is not really necessary to camp at both TsoMoriri and TsoKar. A better idea would be to leave very early from Leh (by 6 am), reach TsoMoriri by noon, spend a couple of hours there, and then reach TsoKar the same evening to camp there. This is pretty doable.
  • Remember there's no hot water facility in any of the camps. If you do camp at TsoMoriri, then you could use the hot water that they provide in the pouches. It is sufficient for a bath if you use it at night when they give it to you. By morning, it would have become lukewarm.
  • We again sorely missed having a wide angle lens at TsoMoriri.
  • Don't miss the opportunity to photograph the wildlife in the pastures – even if it means a detour. Especially Wild asses.
  • There are several stay options on Leh-Manali highway. Most are camps though (Sarchu, Darcha). Proper hotels are available at Keylong and Jispa. Remember that camps are generally much more expensive than hotels.
  • If you are driving yourself, remember to tank up at Leh and also store extra fuel in cans. You aren't going to find any pumps until Tandi (which is 20 kms beyond Keylong).
  • Night travel is strongly discouraged since if you are in a spot, then chances if finding help are very slim.
  • Some camps do not have power outlets in the tents – so charging your mobile phones and camera batteries might not be possible. Conserve the power – switch off your cellphones as soon as you exit Leh. You are not going to need them until you reach Keylong – unless you have a BSNL connection.